

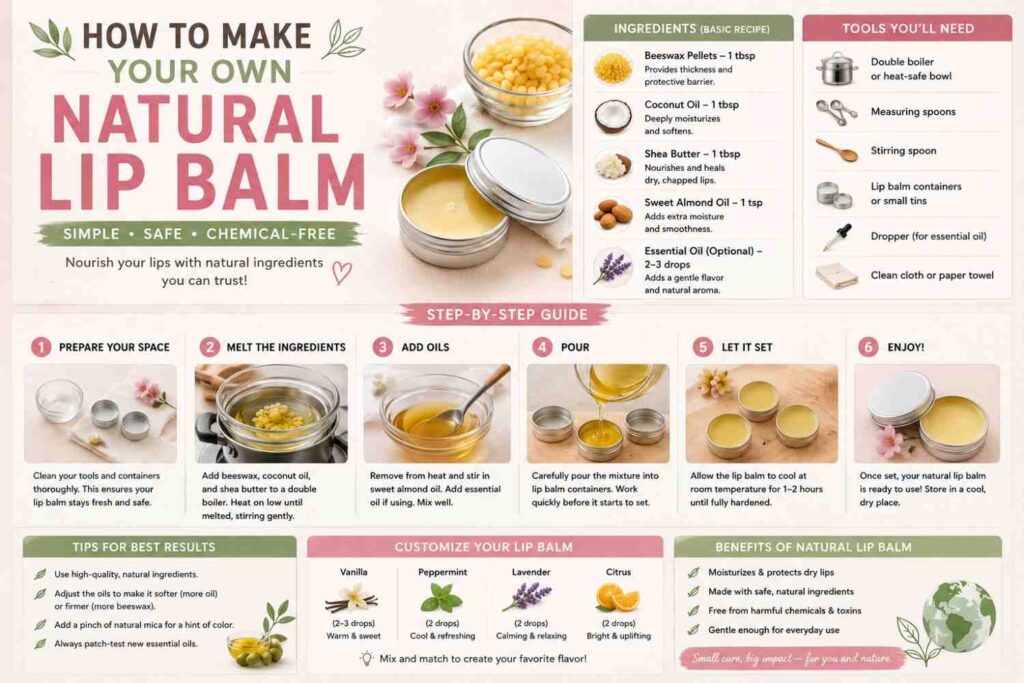
How to Make Your Own Natural Lip Balm at Home
Making your own natural lip balm at home is a simple and cost-effective way to care for your lips using safe, chemical-free ingredients. It allows you to control exactly what goes into the product, avoiding artificial fragrances, preservatives, and harsh additives commonly found in commercial lip balms. Homemade lip balm is also highly customizable, letting you choose your preferred texture, scent, and level of hydration.
Natural lip balms are typically made using a combination of nourishing ingredients such as beeswax, coconut oil, shea butter, and essential oils. These ingredients work together to moisturize, protect, and heal dry or chapped lips. Beeswax helps create a protective barrier, while oils and butters deeply hydrate and soften the skin for long-lasting comfort.
The process of making lip balm at home is straightforward and requires only a few basic tools such as a double boiler, mixing container, and small lip balm containers or tins. By gently melting the ingredients together and pouring the mixture into containers, you can create a smooth, evenly blended balm that solidifies as it cools. This makes it an ideal DIY project even for beginners.
With regular use, homemade natural lip balm can help maintain soft, healthy lips while reducing dryness caused by weather, dehydration, or environmental exposure. Because it is made from natural ingredients, it is generally gentle on sensitive skin and can be easily adjusted to suit personal preferences. This makes DIY lip balm both a practical skincare solution and a fun creative activity.
Why Make Your Own Natural Lip Balm?
Creating natural beauty products at home has become increasingly popular as more consumers seek transparency, quality, and control over the products they apply to their skin. Lip balm is one of the most frequently used personal care products, yet many commercial options contain synthetic fragrances, artificial flavors, petroleum-derived ingredients, and preservatives that may not align with everyone’s skincare preferences. Learning how to make your own natural lip balm allows you to create a product tailored to your needs while using simple, recognizable ingredients.
Another advantage of homemade lip balm is the ability to customize every aspect of the formula. From selecting nourishing oils and plant-based butters to choosing specific scents and textures, DIY lip balm offers flexibility that store-bought products often cannot match. Whether your goal is to soothe dry lips, create a vegan-friendly alternative, or simply enjoy a fun and rewarding DIY skincare project, making lip balm at home is both practical and cost-effective.
In addition to providing moisturizing benefits, natural lip balm can become an important part of a healthy lip care routine. By carefully choosing high-quality ingredients, you can create a product that helps protect the delicate skin on your lips from environmental stressors such as cold weather, wind, and dry indoor air. Understanding the benefits of homemade lip balm is the first step toward creating a personalized skincare product that works for you.
Control What Goes on Your Lips
One of the most compelling reasons to make your own natural lip balm is the complete control it gives you over every ingredient used in the formula. Many commercial lip care products contain long ingredient lists that include synthetic fragrances, artificial dyes, preservatives, and petroleum-based compounds. While many of these ingredients are approved for cosmetic use, some individuals prefer to avoid them due to personal preferences, skin sensitivities, or a desire for a more natural skincare routine.
When creating a DIY lip balm, you have the freedom to choose ingredients that align with your specific needs. For example, you can select organic oils, unrefined shea butter, or sustainably sourced beeswax to ensure higher ingredient quality. This level of customization can be especially beneficial for people with sensitive skin, allergies, or conditions that cause irritation from certain cosmetic additives.
Another advantage is transparency. You know exactly what is included in the final product because you selected and measured every ingredient yourself. This can provide peace of mind and help you avoid unnecessary fillers or additives. By controlling the formulation process, you can create a moisturizing lip balm that contains only beneficial ingredients designed to nourish, protect, and hydrate your lips naturally.
Save Money Over Time
Although purchasing high-quality ingredients may require a modest upfront investment, making homemade lip balm can be surprisingly cost-effective in the long run. A small supply of beeswax, shea butter, and natural oils can produce multiple batches of lip balm, often yielding enough product to fill several tubes or containers. Compared to repeatedly purchasing premium organic lip balm products, DIY production can significantly reduce your overall costs.
Many of the ingredients used in natural lip balm recipes are versatile and can be incorporated into other DIY skincare products as well. Coconut oil, shea butter, and vitamin E oil, for example, are commonly used in body butters, hand creams, and facial moisturizers. This means a single purchase can serve multiple purposes, increasing the value of your investment.
Homemade lip balm also makes thoughtful and affordable gifts. Instead of purchasing expensive gift sets, you can create customized lip balms with different scents, flavors, and packaging styles for family and friends. Over time, the cost per tube becomes very low, especially when ingredients are purchased in larger quantities. For individuals who use lip balm regularly, making it at home can be both a creative hobby and a practical way to save money while enjoying a high-quality product.
Customize Your Formula
Customization is one of the greatest advantages of learning how to make your own natural lip balm. Unlike commercial products that offer limited options, homemade formulations allow you to adjust every element of the recipe to suit your personal preferences. Whether you prefer a lightweight balm for daily use or a richer formula for overnight hydration, you can modify the ingredients to achieve the desired consistency and performance.
Texture is one of the easiest aspects to customize. Increasing the amount of beeswax creates a firmer balm that lasts longer on the lips, while adding more oils results in a softer and smoother texture. You can also experiment with different combinations of nourishing ingredients such as cocoa butter, mango butter, jojoba oil, or avocado oil to create unique formulations.
Fragrance and flavor customization provide additional creative possibilities. Natural options such as peppermint, lavender, vanilla, sweet orange, and lemon essential oils can add pleasant aromas without relying on synthetic fragrances. You can even create seasonal or themed lip balms for holidays and special occasions.
For individuals seeking specific skincare benefits, customization allows targeted ingredient selection. A formula designed for dry, cracked lips may include extra shea butter and vitamin E oil, while a lightweight everyday balm might focus on coconut oil and beeswax. This flexibility ensures your homemade lip balm is perfectly suited to your needs and preferences.
Essential Ingredients for Natural Lip Balm
The success of any homemade lip balm depends largely on the quality and balance of the ingredients used in the formula. While lip balm recipes may appear simple, each ingredient plays a specific role in determining the texture, stability, moisturizing properties, and overall performance of the finished product. Understanding how these ingredients work together can help you create a natural lip balm that not only feels pleasant on the lips but also provides long-lasting hydration and protection.
Most natural lip balm recipes consist of three core components: a wax for structure, oils for moisture, and butters for nourishment. Additional ingredients such as vitamin E oil, natural flavorings, or essential oils can be added to enhance the formula. The ratio between waxes, oils, and butters is particularly important because it affects whether the balm feels firm, soft, glossy, or creamy.
Choosing high-quality ingredients is equally important. Unrefined butters and cold-pressed oils often retain more naturally occurring nutrients and beneficial compounds compared to highly processed alternatives. Many DIY skincare enthusiasts prefer organic ingredients whenever possible to reduce exposure to unnecessary additives and ensure greater ingredient purity.
Before making your first batch, it is helpful to understand the purpose of each ingredient category. This knowledge allows you to troubleshoot texture issues, customize formulations, and confidently experiment with new recipes as your experience grows.
| Ingredient | Category | Main Function | Skin Benefit | Suggested Usage Level |
|---|---|---|---|---|
| Beeswax | Wax | Provides structure & firmness | Protects lips by forming barrier | 20–30% of formula |
| Coconut Oil | Oil | Moisturizing base | Deep hydration & smooth texture | 20–40% |
| Shea Butter | Butter | Nourishment & softness | Repairs dry and cracked lips | 20–30% |
| Cocoa Butter | Butter | Texture enhancer | Long-lasting moisture lock | 10–20% |
| Vitamin E Oil | Additive | Antioxidant protection | Helps extend shelf life | 2–5 drops |
| Essential Oils | Flavoring | Adds scent/flavor | Improves sensory experience | 1–3 drops |
Beeswax for Structure and Protection
Beeswax is one of the most widely used ingredients in homemade lip balm because it provides the structure that holds the formula together. Without a wax component, most lip balm mixtures would remain too soft or oily to apply comfortably. Beeswax creates the solid consistency that allows the balm to maintain its shape while still melting slightly when applied to the lips.
In addition to providing firmness, beeswax forms a protective barrier on the surface of the lips. This barrier helps reduce moisture loss by sealing hydration into the skin while also offering protection against environmental factors such as wind, cold temperatures, and dry air. Unlike some synthetic occlusive ingredients, beeswax creates a breathable layer that helps keep lips comfortable without feeling excessively heavy.
Another benefit of beeswax is its stability. It helps extend the shelf life of lip balm by improving the consistency of the formula and reducing separation between oils and butters. According to research published through the National Center for Biotechnology Information (NCBI), beeswax has long been used in cosmetic formulations due to its emollient and stabilizing properties.
When purchasing beeswax, you can choose between pellets, pastilles, or blocks. Beeswax pellets are particularly popular among beginners because they melt quickly and are easy to measure accurately. Whether you are creating a basic beeswax lip balm or a more advanced formulation, this ingredient remains one of the most reliable foundations for a successful recipe.
Natural Oils for Moisture
Natural oils are responsible for delivering moisture, softness, and glide to a lip balm formula. These oils help replenish the skin’s natural moisture barrier and prevent lips from becoming dry, rough, or cracked. Because the skin on the lips is thinner and more delicate than skin on other parts of the body, it often requires additional hydration to remain healthy and comfortable.
Coconut oil is one of the most commonly used ingredients in DIY lip balm recipes because it offers a smooth texture and excellent moisturizing properties. It blends easily with beeswax and butters, making it ideal for beginners. Jojoba oil is another popular choice because its composition closely resembles the skin’s natural sebum, allowing it to absorb efficiently without leaving a greasy feeling.
Sweet almond oil, avocado oil, and olive oil are also frequently used in natural lip balm formulations. Sweet almond oil provides lightweight hydration, while avocado oil contains beneficial fatty acids that support skin nourishment. Olive oil is readily available and can add rich moisturization, although it may slightly alter the scent of the finished product.
Combining different oils often produces better results than relying on a single oil. By blending multiple nourishing oils, you can create a balanced formula that delivers hydration, improves texture, and helps maintain soft, smooth lips throughout the day.
Butters for Extra Nourishment
Natural plant butters play a crucial role in enhancing both the texture and moisturizing performance of homemade lip balm. While oils primarily provide hydration and spreadability, butters contribute richness, creaminess, and long-lasting nourishment. They help create a more luxurious product that feels smooth and protective when applied to the lips.
Shea butter is one of the most popular ingredients in natural lip care products. Derived from the nuts of the shea tree, it contains beneficial fatty acids and naturally occurring compounds that help condition and soften the skin. A shea butter lip balm is often favored for its creamy texture and ability to provide lasting moisture without feeling overly heavy.
Cocoa butter is another excellent option for DIY lip balm formulations. Known for its rich consistency and subtle chocolate aroma, cocoa butter helps improve the structure of the balm while adding a protective layer that supports moisture retention. Its naturally firm texture can also contribute to a more stable product.
Some formulators choose to incorporate mango butter as well, which offers a lighter feel compared to shea butter while still providing excellent skin-conditioning benefits. By combining different butters with oils and waxes, you can create a customized lip balm that delivers both immediate comfort and long-term nourishment.
The inclusion of high-quality butters often distinguishes an average lip balm from a premium one. Their ability to soften, protect, and replenish the lips makes them an essential component of any effective natural lip balm recipe.
Tools and Supplies You’ll Need
Before making your first batch of natural lip balm, it is important to gather the appropriate tools and supplies. While homemade lip balm is one of the simplest DIY skincare products to create, using the right equipment helps ensure accuracy, consistency, and safety throughout the process. Having everything prepared before you begin will make the production process smoother and reduce the risk of mistakes that could affect the quality of the finished product.
Unlike more complex cosmetic formulations, lip balm does not require specialized laboratory equipment. Most of the necessary tools can be found in a typical kitchen or purchased at a relatively low cost. However, dedicating specific utensils and containers to cosmetic projects is often recommended to maintain cleanliness and avoid cross-contamination.
Proper preparation also contributes to a more professional-looking final product. Measuring ingredients accurately, melting them evenly, and pouring the mixture carefully all play a role in creating lip balm with a consistent texture and appearance. In addition, selecting suitable storage containers helps preserve freshness and makes the product more convenient to use.
Whether you are making lip balm for personal use, gifts, or a small handmade cosmetics business, investing in basic tools and maintaining good organization can significantly improve your results. Understanding the purpose of each item will help you work more efficiently and produce a high-quality natural lip balm every time.
Basic Equipment
Creating a successful homemade lip balm begins with having the right equipment on hand. Fortunately, the list of required tools is relatively short and affordable, making this an accessible project for beginners. One of the most important pieces of equipment is a double boiler or a heat-safe bowl placed over a saucepan of simmering water. This setup allows ingredients to melt gradually and evenly without being exposed to direct heat, which could damage delicate oils and butters.
Measuring spoons or a small digital scale are also essential for achieving consistent results. Precise measurements help maintain the correct balance between waxes, oils, and butters, ensuring the final product has the desired texture. A stirring utensil, such as a silicone spatula or small whisk, helps blend ingredients thoroughly and prevents uneven distribution within the formula.
Many DIY enthusiasts also find pipettes, droppers, or small pouring pitchers useful when transferring melted lip balm into containers. These tools minimize spills and allow for greater accuracy during the pouring process. Additionally, heat-resistant gloves or kitchen towels can improve safety when handling hot equipment.
Keeping your tools clean and dedicated to cosmetic projects can help maintain product quality. Although the equipment requirements are simple, using the right tools correctly can make a noticeable difference in the appearance, texture, and consistency of your finished lip balm.
Lip Balm Containers
Choosing the right container is an important step in the lip balm-making process. The container not only affects how the product is stored and applied but also influences its overall presentation and convenience. Fortunately, there are several options available, each suited to different preferences and purposes.
Lip balm tubes are among the most popular choices because they provide a convenient, mess-free application method. They are ideal for daily use and are easy to carry in a pocket, purse, or travel bag. Tubes are also commonly used by individuals who plan to give lip balm as gifts or sell handmade products because they create a professional appearance.
Small tins are another popular option. These containers often hold a larger amount of product and can accommodate softer balm formulations. Many users appreciate the vintage or handcrafted aesthetic that tins provide. Cosmetic jars are also widely used, particularly for specialty formulations such as tinted lip balms or overnight lip treatments.
Regardless of the container type you choose, proper sanitation is essential. Containers should be thoroughly cleaned and dried before use to reduce the risk of contamination. Purchasing cosmetic-grade containers from reputable suppliers can further improve product quality and safety.
Selecting the appropriate packaging not only protects your lip balm but also enhances the overall user experience, making the product more practical and enjoyable to use.
Ingredient Storage Tips
Proper ingredient storage is often overlooked by beginners, yet it plays a crucial role in maintaining the quality and longevity of both your raw materials and finished lip balm products. Natural oils, butters, and waxes can degrade over time if exposed to excessive heat, moisture, air, or direct sunlight. Understanding how to store these ingredients correctly helps preserve their beneficial properties and reduces waste.
Most carrier oils, including coconut oil, sweet almond oil, and jojoba oil, should be stored in tightly sealed containers away from direct light. Dark glass bottles are often preferred because they help protect oils from oxidation. Exposure to oxygen and sunlight can gradually reduce the effectiveness of certain oils and may lead to unpleasant odors or changes in texture.
Natural butters such as shea butter and cocoa butter should also be stored in cool, dry environments. Excessive heat can cause these ingredients to soften, melt, or develop a grainy texture. Beeswax is generally more stable than oils and butters but should still be kept in a clean, dry location to prevent contamination.
It is also helpful to label ingredients with purchase dates so you can monitor freshness and rotate stock appropriately. Regularly inspecting ingredients for changes in color, smell, or texture can help identify products that may no longer be suitable for cosmetic use.
By following proper storage practices, you can extend the shelf life of your ingredients, maintain formulation quality, and ensure that every batch of lip balm performs as intended.
Step-by-Step Natural Lip Balm Recipe
Making your own natural lip balm may seem intimidating at first, but the process is actually straightforward and beginner-friendly. Once you understand the role of each ingredient and follow a simple preparation method, you can consistently create a high-quality product that rivals many commercial alternatives. One of the biggest advantages of this DIY skincare project is that it requires only a few ingredients and minimal equipment while delivering excellent moisturizing results.
The key to a successful homemade lip balm recipe lies in achieving the correct balance between waxes, oils, and butters. Too much wax can result in a hard, difficult-to-apply balm, while excessive oil may create a product that feels overly soft or melts easily in warm temperatures. Following a tested formula provides a solid foundation that you can later customize to suit your preferences.
This particular natural lip balm recipe is designed to provide a balanced texture that glides smoothly onto the lips while offering long-lasting hydration and protection. The combination of beeswax, coconut oil, and shea butter creates a formula that helps lock in moisture, soothe dryness, and support healthy lips throughout the day.
Whether you are making lip balm for personal use, gifts, or future product development, understanding the ingredients, preparation process, and cooling phase will help ensure professional-quality results with every batch.
Ingredients
Every ingredient in a natural lip balm formula serves a specific purpose, contributing to the texture, stability, and moisturizing performance of the final product. The recipe below uses a simple combination of ingredients that are widely available, easy to work with, and highly effective for lip care.
| Ingredient | Amount | Purpose |
|---|---|---|
| Beeswax | 1 tablespoon | Provides firmness and structure |
| Coconut Oil | 1 tablespoon | Adds moisture and smooth application |
| Shea Butter | 1 tablespoon | Delivers nourishment and conditioning |
| Vitamin E Oil | 3–4 drops | Supports antioxidant protection |
| Essential Oil (Optional) | 2–3 drops | Adds natural fragrance |
Beeswax acts as the structural foundation of the balm, helping it maintain its shape while creating a protective barrier on the lips. Coconut oil contributes lightweight hydration and helps the balm spread evenly during application. Shea butter enhances the moisturizing properties of the formula and provides a creamy texture that feels comfortable on the skin.
Vitamin E oil is often included because of its antioxidant properties, which may help extend the shelf life of oils used in the formulation. Optional essential oils can add pleasant scents, but they should always be used sparingly and selected carefully to ensure they are safe for lip products.
As you gain experience, you can experiment with ingredient substitutions and additional additives. However, starting with a simple, balanced formula is the best way to learn how different ingredients interact and influence the final product.
Preparation Process
The preparation stage is where individual ingredients are transformed into a smooth, uniform lip balm mixture. While the process is relatively simple, attention to detail can greatly improve the consistency and quality of the finished product. Proper melting techniques help preserve ingredient integrity and prevent issues such as graininess, separation, or uneven texture.
Begin by adding a small amount of water to a saucepan and placing it over low to medium heat. Position a heat-safe bowl over the saucepan to create a double boiler. This indirect heating method is preferred because it melts ingredients gradually and reduces the risk of overheating sensitive oils and butters.
Next, add the beeswax, coconut oil, and shea butter to the bowl. Stir occasionally as the ingredients melt together. Beeswax generally takes the longest to liquefy, so patience is important during this stage. Continue stirring until the mixture becomes completely smooth and uniform.
Once all ingredients have melted, remove the bowl from the heat source. Allow the mixture to cool slightly before adding vitamin E oil and any optional essential oils. Adding these ingredients after heating helps preserve their beneficial properties and fragrance.
Stir thoroughly to ensure even distribution throughout the mixture. At this stage, the formula should appear smooth, glossy, and fully blended. Proper mixing is essential because it ensures that each container of lip balm will have a consistent texture and performance once it hardens.
Pouring and Cooling
The pouring and cooling stage is often underestimated, yet it plays a significant role in determining the final appearance and texture of your homemade lip balm. Once the ingredients have been thoroughly mixed, the melted formula should be transferred into prepared containers while it remains warm and fluid. Working efficiently during this stage helps prevent premature thickening that can make pouring more difficult.
Using a pipette, dropper, or small pouring pitcher can help improve accuracy and minimize spills. Carefully fill each lip balm tube, tin, or jar, leaving a small amount of space at the top if necessary. If you are producing multiple containers, work steadily to ensure the mixture remains easy to pour throughout the process.
After filling the containers, place them on a flat, stable surface where they can cool undisturbed. Most natural lip balm formulations require approximately 30 to 60 minutes to fully harden at room temperature. Avoid moving the containers during this period, as disturbances can create uneven surfaces or affect the final appearance.
While some people choose to speed up the cooling process by placing containers in the refrigerator, gradual cooling at room temperature often produces better texture and consistency. Once the balm has completely solidified, inspect the surface for smoothness and uniformity.
After cooling, cap the containers securely and label them if desired. Your natural lip balm is now ready for use, gifting, or storage. With proper preparation and cooling techniques, you can achieve a professional-looking product that feels smooth, moisturizing, and enjoyable to use.
Ways to Customize Your DIY Lip Balm
One of the most enjoyable aspects of learning how to make your own natural lip balm is the ability to fully customize it according to personal preference. Unlike mass-produced products that follow a fixed formula, DIY lip balm allows you to experiment with textures, scents, colors, and even functional benefits. This flexibility is what makes homemade lip care both practical and creative.
Customization is not just about aesthetics—it also allows you to tailor the product to specific skincare needs. For example, someone with extremely dry lips may prefer a richer formulation with extra butters, while another person may want a lightweight balm suitable for daily reapplication. By adjusting ingredients and additives, you can create multiple versions of lip balm for different situations and seasons.
Another advantage of customization is that it encourages experimentation and learning. Over time, you begin to understand how different ingredients interact, how wax ratios affect firmness, and how essential oils influence fragrance intensity. This knowledge can even serve as a foundation for more advanced DIY skincare projects.
Whether your goal is to create unique gifts, develop a signature scent, or simply enhance your personal lip care routine, customization transforms a basic recipe into a versatile skincare product tailored entirely to your needs.
Add Natural Flavors
Adding natural flavors to lip balm is one of the simplest ways to enhance the user experience. While the primary purpose of lip balm is to moisturize and protect the lips, pleasant scents and flavors can make the product more enjoyable and encourage regular use. Natural flavoring also helps avoid synthetic additives commonly found in commercial products.
Popular choices include peppermint essential oil, which provides a refreshing cooling sensation on the lips, and vanilla extract, which adds a warm and comforting aroma. Sweet orange, lemon, and lavender essential oils are also commonly used in DIY lip balm formulations due to their pleasant fragrance profiles.
When using essential oils, it is important to exercise caution and use them in very small quantities. The skin on the lips is delicate and can be sensitive to strong concentrations. Typically, only a few drops are needed for an entire batch. Overuse can lead to irritation or overpowering scents.
Flavor customization should always prioritize safety. Only lip-safe essential oils and flavoring agents should be used, and they should be properly diluted within the lip balm base. When done correctly, natural flavor additions can significantly enhance the overall appeal of your homemade lip balm without compromising its moisturizing effectiveness.
Create a Tinted Lip Balm
Tinted lip balm combines skincare and subtle color enhancement in a single product, making it a popular variation of traditional lip balm. It provides hydration while also adding a natural-looking tint to the lips, eliminating the need for separate cosmetic products in some cases. This makes it particularly appealing for individuals who prefer a minimal makeup routine.
Natural colorants are commonly used in DIY tinted lip balm recipes. Beetroot powder is one of the most popular options because it produces a soft pink or red hue while remaining plant-based. Cocoa powder can create warm brown tones, while mica powders approved for cosmetic use offer a wider range of shimmer and color effects.
When creating tinted lip balm, it is important to mix colorants thoroughly into the melted base to avoid uneven pigmentation. Small batches should be tested first to ensure the desired shade is achieved before scaling up the recipe. This helps prevent waste and allows for better control over color intensity.
The amount of colorant used should always be minimal, as too much can affect the texture or performance of the balm. The goal is to achieve a natural tint rather than a heavy lipstick-like effect. When properly formulated, tinted lip balm offers a balanced combination of hydration, comfort, and subtle enhancement suitable for everyday wear.
Make a Vegan Alternative
For individuals who prefer plant-based skincare products, creating a vegan lip balm is a great alternative to traditional formulations that use beeswax. Vegan lip balm replaces animal-derived ingredients with plant-based waxes while maintaining similar structural and moisturizing properties.
Two commonly used vegan waxes are candelilla wax and carnauba wax. Candelilla wax is derived from the leaves of the candelilla shrub and is known for its relatively smooth texture and strong holding power. Carnauba wax, sourced from the leaves of the carnauba palm, is harder and often used in smaller quantities to achieve the desired firmness.
When substituting beeswax with plant-based waxes, it is important to adjust the formulation because these waxes behave differently in terms of melting point and hardness. Typically, less vegan wax is needed compared to beeswax to achieve a similar consistency. Small adjustments may be required through testing to find the perfect balance between firmness and spreadability.
Vegan lip balm formulations can still include nourishing oils such as coconut oil, jojoba oil, and sweet almond oil, along with plant-based butters like shea or cocoa butter. The result is a fully plant-based product that remains effective at moisturizing and protecting the lips while aligning with vegan skincare preferences.
Common Mistakes to Avoid
Even though making natural lip balm is considered one of the simplest DIY skincare projects, beginners often encounter small mistakes that can affect the texture, performance, or stability of the final product. Understanding these common errors in advance can help you avoid wasted ingredients and ensure a more consistent, high-quality result.
Most issues in homemade lip balm come from incorrect ingredient ratios, overheating during the melting process, or poor hygiene practices. Since lip balm is a leave-on product applied directly to the lips, even small formulation or handling mistakes can affect user experience.
Another common challenge is inconsistency between batches. Without careful measurement and attention to detail, one batch may turn out too soft while another becomes overly hard. Learning how to identify and correct these issues is an important part of improving your DIY skincare skills.
By being aware of these potential pitfalls, you can refine your technique and create a natural lip balm that performs reliably every time. This section highlights the most frequent mistakes and explains how to prevent them effectively.
| Problem | Cause | Solution | Prevention Tip |
|---|---|---|---|
| Lip balm too hard | Too much beeswax | Re-melt and add more oil | Maintain balanced wax ratio |
| Lip balm too soft | Too much oil | Add more beeswax or butter | Measure ingredients accurately |
| Grainy texture | Overheating butters | Melt slowly using double boiler | Avoid high heat |
| Separation after cooling | Improper mixing | Re-melt and mix thoroughly | Stir continuously while cooling |
| Weak fragrance | Too few essential oils | Add 1–2 extra drops | Add oils after cooling slightly |
| Short shelf life | Contamination or low-quality oils | Use fresh ingredients & vitamin E | Store in cool, dry place |
Using Too Much Beeswax
One of the most common mistakes in DIY lip balm formulation is using too much beeswax. While beeswax is essential for giving lip balm its structure and firmness, excessive amounts can significantly alter the texture of the final product. A balm that contains too much wax often becomes overly hard, making it difficult to apply smoothly to the lips.
When the product is too firm, users may find themselves pressing harder or warming the balm excessively before use, which reduces convenience and comfort. In some cases, an overly wax-heavy formula may feel dry or drag across the lips instead of gliding effortlessly.
To correct this issue, it is important to maintain a balanced wax-to-oil ratio. If a batch turns out too hard, you can remelt the mixture and add a small amount of additional carrier oil such as coconut oil, jojoba oil, or sweet almond oil to soften the texture. This simple adjustment can significantly improve usability.
A good practice is to start with small test batches before scaling up a recipe. This allows you to fine-tune the wax ratio and achieve the ideal consistency for your personal preference or product goal. Understanding how beeswax behaves in different concentrations is key to mastering natural lip balm formulation.
Overheating Ingredients
Overheating is another frequent mistake that can negatively impact the quality of homemade lip balm. Natural oils, butters, and essential oils are sensitive to excessive heat, and prolonged exposure to high temperatures can degrade their beneficial properties. This may result in a less effective or less pleasant final product.
When ingredients are overheated, the texture of the lip balm can also be affected. Oils may lose their smooth consistency, and the mixture may become grainy or separate after cooling. Essential oils, in particular, are volatile and can lose their fragrance or therapeutic properties if added to excessively hot mixtures.
To avoid this issue, it is recommended to always use gentle, indirect heat such as a double boiler. This method allows ingredients to melt slowly and evenly without direct exposure to flame or high heat. Stirring continuously also helps distribute heat evenly and prevents localized overheating.
Another best practice is to remove the mixture from heat as soon as everything is fully melted. Allowing it to cool slightly before adding heat-sensitive ingredients helps preserve their quality. Careful temperature control is essential for maintaining the integrity, effectiveness, and sensory appeal of your natural lip balm.
Ignoring Cleanliness
Maintaining proper cleanliness is often underestimated but is extremely important when making any skincare product, including lip balm. Since lip balm is applied directly to the lips and often used multiple times a day, contamination can reduce product safety and shelf life.
Failing to sanitize tools, containers, or work surfaces can introduce bacteria or impurities into the mixture. Even small amounts of contamination may lead to changes in texture, odor, or overall product stability over time. This is especially important if the lip balm is intended for gifting or small-scale selling.
To avoid these issues, all equipment should be thoroughly washed and dried before use. Containers should be cleaned with warm soapy water and, when possible, disinfected with alcohol to ensure they are free from residues. Work surfaces should also be kept clean and organized to minimize exposure to dust or debris.
Another important practice is to avoid touching the melted mixture with unclean utensils or hands. Using dedicated cosmetic tools helps maintain hygiene standards and ensures a more professional-quality product. By prioritizing cleanliness, you not only protect the integrity of your lip balm but also extend its usability and overall safety.
Storage, Shelf Life, and Safety Tips
Proper storage and handling of homemade lip balm are just as important as the formulation process itself. Even when made with high-quality natural ingredients, lip balm can lose its effectiveness or degrade over time if it is not stored correctly. Factors such as temperature, exposure to light, air, and contamination can all influence the shelf life and performance of the product.
Because natural lip balm does not usually contain synthetic preservatives, it is more sensitive to environmental conditions compared to commercial products. This makes storage practices a key part of maintaining product safety and consistency. Understanding how long your lip balm lasts, how to store it properly, and how to identify signs of spoilage will help ensure that every application remains safe and effective.
In addition to storage, basic safety practices such as patch testing and ingredient awareness are essential. Even natural ingredients can cause sensitivities in some individuals, so careful use and observation are important. By following proper storage and safety guidelines, you can extend the life of your lip balm while maintaining its moisturizing and protective benefits.
How Long Does Homemade Lip Balm Last?
The shelf life of homemade lip balm typically ranges between 6 to 12 months, depending on the ingredients used and how well the product is stored. Lip balms made with stable ingredients such as beeswax and saturated oils like coconut oil tend to last longer, while those containing more delicate oils may have a shorter lifespan.
One important factor influencing shelf life is oxidation. Natural oils can gradually break down when exposed to air and light, leading to changes in smell, texture, or color. The inclusion of vitamin E oil can help slow this process by acting as a natural antioxidant, although it does not function as a full preservative.
Another factor is contamination. If lip balm is frequently exposed to unclean fingers or surfaces, bacteria can be introduced into the product, reducing its usability over time. This is especially common in jar or tin packaging, where direct contact occurs more often compared to tube packaging.
It is important to regularly check your lip balm for signs of spoilage, such as unusual odors, grainy texture, or visible changes in appearance. If any of these signs appear, it is best to discard the product and prepare a fresh batch. Proper ingredient selection and handling practices can significantly improve shelf life.
Best Storage Conditions
Storing homemade lip balm correctly helps preserve its texture, effectiveness, and overall quality. The ideal storage environment is cool, dry, and away from direct sunlight. Excess heat can cause the balm to soften, melt, or separate, while exposure to light can accelerate the degradation of natural oils.
A stable room temperature environment is usually sufficient for storage. Avoid placing lip balm near heat sources such as radiators, stoves, or windows that receive direct sunlight. During warmer months, it may be helpful to store lip balm in a cooler area of the home to prevent melting or texture changes.
Containers also play an important role in maintaining product stability. Tight-fitting lids help prevent air exposure, which can reduce oxidation and preserve freshness. Lip balm tubes generally offer better protection compared to open tins or jars, especially for long-term storage or travel use.
Labeling your containers with production dates is another useful practice. This helps you track freshness and ensures that older batches are used before newer ones. By maintaining proper storage conditions, you can significantly extend the usability and performance of your natural lip balm while keeping it safe and enjoyable to use.
Perform a Patch Test
Performing a patch test is an essential safety step when using any new skincare product, including homemade lip balm. Even though the ingredients used in natural formulations are generally gentle, individual skin sensitivities can vary. A patch test helps identify potential allergic reactions or irritation before applying the product regularly.
To perform a patch test, apply a small amount of lip balm to a discreet area of skin, such as the inside of the wrist or behind the ear. Leave it on for at least 24 hours and observe for any signs of redness, itching, swelling, or discomfort. If no reaction occurs, the product is generally considered safe for regular use.
This step is especially important when introducing new ingredients such as essential oils, flavorings, or botanical extracts. Some natural substances can still cause sensitivity in certain individuals, particularly when used in concentrated form. Essential oils, in particular, should always be used sparingly and with caution.
Patch testing is a simple yet effective way to ensure safety and confidence in your DIY skincare routine. By taking this precaution, you reduce the risk of adverse reactions and ensure that your homemade lip balm provides only its intended benefits—hydration, comfort, and protection for the lips.
Frequently Asked Questions
The following FAQs address the most common concerns beginners and DIY skincare enthusiasts have when learning how to make your own natural lip balm. These answers are designed to provide clear, practical guidance and help you avoid confusion during the formulation process. Understanding these questions will also improve your ability to troubleshoot recipes and make informed decisions about ingredients and techniques.
What ingredients are needed to make natural lip balm?
Natural lip balm typically requires a combination of wax, oil, and butter to achieve the right balance of structure and moisture. The most common ingredients include beeswax, coconut oil, and shea butter, which together create a smooth and protective balm. Optional additions such as vitamin E oil and essential oils can enhance shelf life and add fragrance.
These ingredients work together to hydrate dry lips, lock in moisture, and create a protective barrier against environmental stressors. Beginners often start with a simple three-ingredient base before experimenting with more advanced formulations.
Can I make lip balm without beeswax?
Yes, it is possible to make lip balm without beeswax by using plant-based alternatives such as candelilla wax or carnauba wax. These vegan-friendly waxes provide structure and firmness similar to beeswax, although their melting points and hardness levels differ.
When substituting beeswax, adjustments to the wax-to-oil ratio are usually necessary. Candelilla wax is stronger than beeswax, so less is typically required. Testing small batches is recommended to achieve the desired consistency and application feel.
Is homemade lip balm better than store-bought lip balm?
Homemade lip balm offers greater control over ingredients, making it a preferred option for individuals who want to avoid synthetic additives or customize their skincare routine. It allows you to choose natural oils, butters, and waxes tailored to your needs.
However, store-bought lip balms often undergo stability testing and may include preservatives that extend shelf life. The “better” option depends on personal preference, ingredient awareness, and desired convenience. Both can be effective when used appropriately.
What oils are best for DIY lip balm?
Several natural oils work well in DIY lip balm formulations due to their moisturizing and skin-conditioning properties. Common choices include coconut oil, jojoba oil, sweet almond oil, avocado oil, and olive oil.
Each oil has unique benefits. For example, jojoba oil closely resembles the skin’s natural sebum, while coconut oil provides smooth texture and hydration. Blending oils often produces a more balanced and effective lip balm formula.
How long does homemade lip balm last?
Homemade lip balm typically lasts between 6 to 12 months when stored properly in a cool, dry place away from direct sunlight. The exact shelf life depends on the freshness of the ingredients used and storage conditions.
Adding vitamin E oil may help slow oxidation, but it does not act as a full preservative. Always check for changes in smell, texture, or appearance before use, and discard the product if any signs of spoilage appear.
Can I use essential oils in lip balm?
Yes, essential oils can be used in lip balm, but they must be added in very small amounts and chosen carefully. Lip-safe options such as peppermint, lavender, and sweet orange are commonly used in DIY formulations.
Overuse of essential oils can cause irritation due to the sensitivity of lip skin. It is important to dilute them properly within the balm base and avoid strong or non-recommended oils for lip application.
Can homemade lip balm help dry and cracked lips?
Yes, a well-formulated homemade lip balm can help soothe and protect dry, cracked lips by locking in moisture and preventing further dehydration. Ingredients such as beeswax, shea butter, and coconut oil work together to hydrate and form a protective barrier.
While lip balm can significantly improve lip condition, consistent use and proper hydration habits are also important for maintaining long-term lip health.
Conclusion
Learning how to make your own natural lip balm is a practical and rewarding skill that combines creativity with skincare benefits. By using simple, natural ingredients like beeswax, coconut oil, and shea butter, you can create a nourishing product that supports soft, hydrated, and healthy lips without relying on unnecessary additives.
Throughout this guide, you’ve learned how each ingredient contributes to the formula, how to properly prepare and customize your lip balm, and how to avoid common mistakes that can affect quality. You also now understand the importance of proper storage, safety practices, and ingredient balance in achieving consistent results.
Whether you are making lip balm for personal use, gifting, or exploring DIY skincare as a hobby, this process allows you to take full control of what you apply to your skin. With practice, you can refine your recipes and develop formulations that perfectly match your preferences and lifestyle.
Natural lip balm is more than just a skincare product—it is a simple step toward a more mindful and personalized approach to beauty and self-care.